Camera Cage vs L-Bracket: Full Rigging or Quick Vertical Swaps?
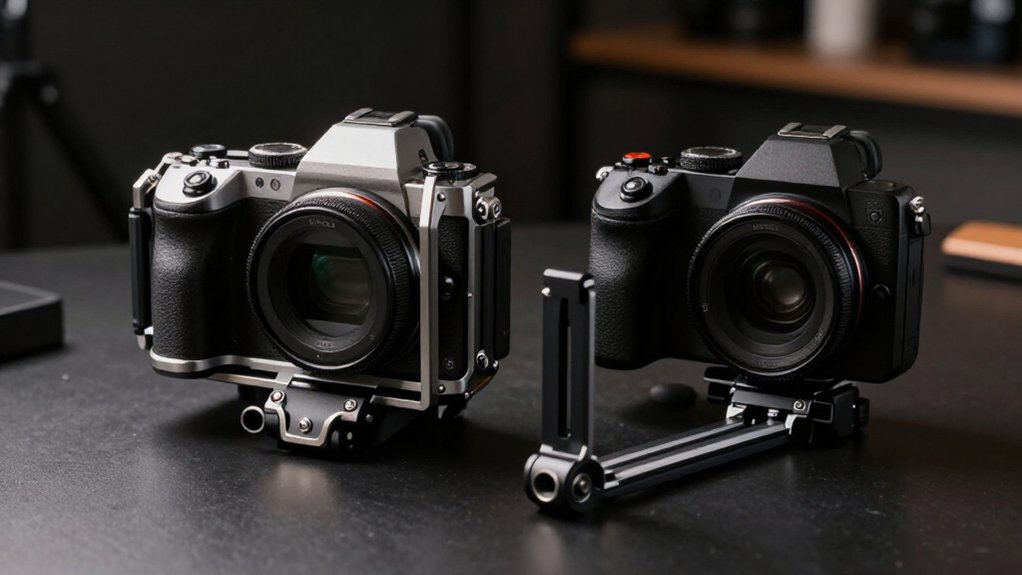
Choose a camera cage when you need accessory mounting points for rods, follow-focus motors, matte boxes, or external batteries; it adds bulk and setup complexity. Choose an L-bracket when you want compact, secure 90-degree swaps without tilting the tripod head sideways.
Check battery-door and port access, flip-screen clearance, and follow-focus cables before buying.
For long shoots, weigh comfort, stability, and heat clearance against rigging needs. The comparison ahead shows which trade-offs matter for your setup.
Port and Battery Access
With an L-bracket, you may need to release or slide the side plate to reach covered ports or the battery door, a hassle that’s more noticeable when the camera is mounted vertically. Compare the clearance before you buy: premium RRS or Kirk plates on some bodies stop short of the battery grip, while cheaper plates may extend farther and cover more of it.
A flip screen that swings left can also strike the side plate.
| Design | Access |
|---|---|
| Folding SmallRig | Latch; latch and rotate or slide plate outward |
| Rotating collar | Keeps ports open through 90° swaps |
Choose a folding plate when you need adjustable side clearance; choose the collar when you want horizontal-to-vertical changes without blocking ports or creating battery-door conflicts during quick changes often.
Mounting Points and Rig Layout
Once you’ve checked access, compare how each setup handles accessories and camera balance.
An L-bracket gives you a cantilever mount with Arca-Swiss rails on its base and side. You can rotate the camera 90° for vertical or horizontal framing while keeping the tripod-head rotation center aligned with the camera’s weight axis.
Choose a cage or dual-bar rig when you need to attach accessories to the camera. Its 15mm or 19mm rods give you positions for follow-focus motors, matte boxes, and external batteries. Connection interfaces can flex; bar length or material differences may produce micro-vibration in high-resolution video.
For stable panning or stitching, use a flip-friendly bracket that preserves access in both orientations without tilting the camera off-axis. Choose the layout that matches your hardware.
Rig Weight and Bulk
If you’re prioritizing a light, compact setup, an L-bracket keeps the camera close to the tripod and adds little bulk. Its simpler structure suits you when you mount the camera directly to a tripod, with less height buildup.
A cage or dual-bar rig expands your package: 15mm or 19mm rods, baseplates, and mounts for monitors, follow-focus motors, or external batteries add weight and footprint. Raised rail mounts also increase camera height and the moment arm, so fuller rigs demand more handling effort.
Modeling puts wrist torque at 7.3 N·m for a dual-bar system, versus 2.9 N·m for an L-bracket; that difference reflects the burden you may feel. A cage-and-quick-release hybrid can speed swaps, but you’ll still carry more rig weight than with an L-bracket alone.
One-Handed Portrait Reorientation
Beyond weight and bulk, portrait reorientation affects how quickly and confidently you can work. On a tripod, an L-bracket lets you rotate your camera 90° without tilting the head sideways. That keeps a heavy camera-and-lens setup feeling more secure than turning it into an unbalanced position.
For faster handling, consider a rotating collar or foldable L-bracket. A rotating collar turns 90° in any configuration while preserving access to side buttons and ports and avoiding the flip-screen path.
A foldable design uses two rear buttons: release the side plate, rotate it counterclockwise, then fold it back. This avoids repositioning a plate blocked by the screen or ports.
A dual-bar cage workflow takes longer one-handed: extra connection points add steps and potential flex. If quick swaps matter, choose the simpler rotation method that suits your camera.
Follow-Focus Gear Clearance
When you add a follow-focus, check that its motor, rods, and cables clear an L-bracket’s fixed side plate during a 90° rotation. Because an L-bracket uses a single-piece, cantilevered mount, its vertical member can crowd the lens barrel and reduce room for rods, motors, or cable runs.
Before you lock the camera on a tripod, rotate it through the full swing in both orientations and watch for snags or flex at connectors.
Cages often keep follow-focus motors and handwheels on separate rods, so the camera body’s less likely to block gear. If your setup reaches around the lens end, choose a folding or rotating side plate for better access than a fixed plate.
Check clearance again after every repositioning to prevent leads from catching.
Used-Resale Value
After checking gear clearance, consider how easily you could resell the setup.
An L-bracket often stays on your main camera body for identification and quick tripod changes, so you can resell it as a usable accessory. A cage usually brings more compatibility risk: buyers need the matching camera model because its contours and shoe or load layout are specific.
In either setup, standard interfaces such as Arca-Swiss rails, QD sockets, and 1/4-20 threads help preserve value by letting the next owner adapt the rig.
Your workflow can narrow the buyer pool. If you’ve built around a monitor, follow-focus motor, or external battery, include the exact accessories and mounting details, or document how to reproduce them. A rotating-collar system may depreciate faster if uncommon; list supported models and show that ports and flip screens remain clearly accessible.
Heat and Ventilation Clearance
Heat clearance depends on how much of the camera body your rig leaves exposed. A cage leaves more room around the body for accessories. When you add a monitor, wireless receiver, or external power, that open space can help heat escape.
An L-bracket hugs the camera closely; its side plate may cover airflow paths or sit beside ports and cable routes. During long takes, blocked surfaces and rerouted cables can limit heat dissipation.
- Check whether the plate crowds vents, ports, or cable paths.
- Compare how far each design extends toward the battery grip.
- Choose a stop-short design for more grip-area clearance.
- Consider a folding or rotating plate if you need access during sessions.
Higher external thermal load often favors cages; L-brackets suit quick swaps.
Clamp and Cage Stability
When you tighten a cage clamp, check for movement under lens torque; extra joints can flex and transmit micro-vibrations.
An L-bracket’s single-piece, body-hugging design resists torsion and keeps the camera lower than most dual-bar rigs. Compare clamp grip and cage rigidity under your actual load before choosing modularity over stiffness.
Clamp Grip Strength
A mount’s grip depends on how well it resists both twisting and flexing under load. When you compare an L-bracket with a modular dual-bar setup, the simpler cantilevered mount can resist lens-induced torsion with less clamping demand. Use these checks before you commit:
- Compare the proxy torque: about 2.9 N·m for the L-bracket versus 7.3 N·m for dual bars.
- Treat the higher figure as greater grip demand, not proof that you should crank harder.
- For windy work, the L-bracket’s modeled tipping threshold is roughly 16 m/s; dual bars reach about 13.5 m/s.
- Tighten hardware firmly, but don’t over-tighten: repeated pressure can deform aluminum mating surfaces and spoil Arca-Swiss clamping contact.
If you swap orientations often, verify the clamp stays secure consistently after each change.
Cage Flex and Rigidity
Grip strength also depends on how much the mount and cage flex under load. An L-bracket uses a single-piece cantilevered mount that hugs your camera chassis, resisting torsional twist better under a heavy lens than a modular rig. A dual-bar cage routes load through rod, rail, plate, and cage connections; each interface can flex slightly and add micro-vibrations.
Wind models put the L-bracket’s tipping threshold near 16 m/s (58 km/h), versus 13.5 m/s (49 km/h) for dual bars, so you get better lateral stability.
Tripod assumptions require intact mating surfaces; stacked interfaces complicate that. A rigid assembly lowers modeled wrist torque: 2.9 N·m versus 7.3 N·m for dual bars. You’ll swap more calmly with an L-bracket; choose a cage for extra rigging points.
Rigging for Long Shoots
Over a long shoot, an L-bracket’s lower wrist torque can ease sustained handling, while a cage’s added bulk may shift the balance. Choose a cage when you need modular add-ons, but check that its layout preserves battery access.
Dedicated quick-release parts can speed vertical swaps and reduce handling effort.
Sustained Comfort
On long shoots, an L-bracket’s single-piece cantilever keeps the rig simpler to manage and resists torsional twist under heavy lens loads. You’ll feel the ergonomic difference during repeated repositioning: the L-bracket needs about 2.9 N·m of wrist torque, versus 7.3 N·m for a dual-bar setup.
For handheld adjustments, lower torque can reduce fatigue across a long day.
For locked-off work, the bracket tolerates more wind before tipping: roughly 16 m/s, compared with 13.5 m/s for dual bars.
Cages add connection points, so flex and micro-vibration may trouble high-resolution footage over time. Choose dual bars when you need substantial modular loads; accept extra setup friction and inspect joints regularly.
For sustained positioning, the L-bracket keeps handling predictable without sacrificing support under a heavy lens.
Battery Access
Battery access can become a bottleneck on long shoots: many L-brackets make the door harder to reach and can complicate card changes, especially after a 90° rotation. On a long run, that extra step costs time whenever you swap batteries or cards.
Some low-cost brackets cover the battery-grip area, while better-clearanced models stop short; a hinged section can also swing aside without removing the plate.
Cages often leave the compartment and card slots more accessible, though fixed side plates may block ports when you mount vertically on a tripod. Before a long shoot, check fit on your exact camera body and test door clearance after rotating it 90°; you’ll reduce downtime during repeated battery and card swaps on location too.
Balanced Load
For long shoots with heavier lenses, an L-bracket’s cantilevered design is typically modeled as more torsion-resistant, with a wind-load tipping point around 16 m/s (58 km/h), compared with 13.5 m/s (49 km/h) for a dual-bar rig.
For extended takes, assess payload, support stiffness, and comfort before locking in your rig choice.
- Choose the L-bracket for rigid tripod mounting, quick vertical swaps, and lower wrist torque: the model estimates 2.9 N·m, versus 7.3 N·m with dual bars.
- Its lower camera height also reduces tipping leverage during sustained lens and battery loads.
- Use dual bars when you need follow-focus, a matte box, or external batteries, but account for added height and connection points that can flex.
- Mixed materials or rail lengths may amplify micro-vibrations on high-resolution takes.
Rain-Ready Rig Choices
In rain-heavy field work, an L-bracket keeps horizontal-to-vertical tripod swaps quick and the rig compact, while a cage offers a stronger mounting platform for weather-protected monitors, mics, lights, and external power.
Choose an L-bracket when you need fewer parts; foldable designs like SmallRig’s can preserve port and flip-screen access. Check battery doors and card slots; side plates may need opening or sliding, awkward in rain.
If you add accessories or external power, choose a cage or cage-and-quick-release setup: it supports mounting without depending on side-plate access. In gusty wind, a single-piece L-bracket cantilever may resist tipping: about 16 m/s versus 13.5 m/s for a dual-bar system. QD sockets, such as those on the 3 Legged Thing Lexie QD, let you switch between tripod and strap without removing hardware.
Conclusion
Choose an L-bracket if you mainly need quick landscape-to-portrait swaps, a lighter rig, and clear access to the battery and ports. Choose a cage when you need multiple mounting points for follow-focus gear, accessories, or long-shoot support. Before buying, check clamp stability, ventilation, and clearance with your actual lens and cables.
For rain, neither option replaces proper weather protection. Match the setup to your shooting needs: carry less for fast changes, or add structure for a fully rigged camera.