How Often Should You Service Tripod Leg Locks? A Simple Schedule
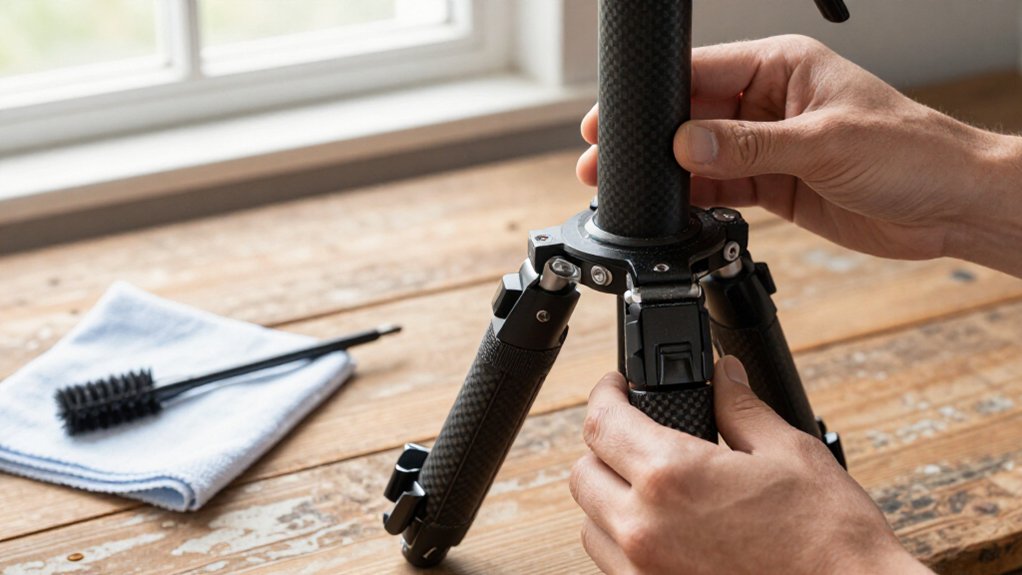
Service tripod leg locks monthly during dusty peak season, and every five to ten shoots in desert conditions.
After each dusty shoot, wipe debris and check that locks turn smoothly and hold without leg creep.
Clean immediately after sand, mud, salt spray, submersion, or gritty movement.
Brush out grit gently, then let sleeves and threads dry fully before reassembly.
If a lock grinds or slips, clean it before use.
Further checks can help keep locks reliable.
Preventing Grit-Induced Lock Slippage
Clean your tripod’s leg locks whenever tightening or loosening feels gritty; debris in the threads or cam surfaces can wear them down and cause the legs to creep under load.
After muddy or sandy outings or salt-spray exposure, rinse the locks and leg sections before opening them. Trapped grit and moisture raise friction and score leg tubes and lock bushings.
For twist-locks, clean the threaded collar and inside of the knuckle or leg lock, then reassemble dry. Lubricant won’t correct slippage caused by abrasive grit. For flip-locks, check that locks clamp firmly; you shouldn’t need constant adjustment.
Do a post-shoot cleaning and dry check. After submersion or heavy contamination, disassemble, clean, dry, and reassemble without lubricant unless the manufacturer specifies it.
Soft-Bristle Detailing Brush
For detailed cleaning, use a soft-bristle brush to loosen grit from lock threads, knuckles, and plastic bushings without scratching the leg tubes or wearing down shims.
Use water and a light rinse to lift embedded sand before reassembly; grit left in threads can turn smooth tightening into grinding.
- Brush the threads and knuckles gently, keeping bristles off exposed tube surfaces.
- Rotate the inner plastic sleeve while brushing trapped grit from its contact surfaces.
- Rinse the brush whenever it collects visible debris, then continue until parts feel smooth.
- Work the lock open and closed; stop when movement no longer crunches.
Keep cleaning targeted: reassemble components dry, because lubricant can capture fresh dust and grit. Use the brush for removal, not grease application during routine service.
Monthly Lock-Tension Check
Once a month, extend the legs, tighten each lock until firm, then gently press or rock each leg to confirm it doesn’t creep or slip under normal load.
Check each design:
| Lock type | Check |
|---|---|
| Twist-lock | Turn the collar smoothly; stop if threads feel gritty. |
| Flip-cam | Confirm full lateral pressure; verify the leg stays still. |
| Either | No creep or slip under a gentle, normal load. |
Repeat the check after sand, salt spray, silty runoff, or mud; grit at the lock interface drives wear and permanent scoring.
If tightening or releasing feels gritty, grinds, or feels worse than before, clean and reassemble that lock rather than waiting. A collar that resists or a cam that loses tension can let a leg slip, even with a light camera.
Dry Sleeves Before Reassembly
After cleaning the locks, remove trapped moisture and air-dry each sleeve and leg tube completely. Check sleeve seams for grit or damage, and don’t use direct heat.
Before reassembly, confirm all parts are dry and correctly positioned.
Remove Trapped Moisture
Before reassembling a tripod leg lock, make sure its internal plastic sleeve and mating surfaces are completely dry. Remove the lock and slide the leg fully out. Wipe the interior, sleeve, and threads with a clean cloth.
After water, mud, or salty spray, rinse residue from these parts, then wipe them.
Inspect by touch, not appearance alone. Pass a clean fingertip or cloth over the sleeve and threads. If you feel grit, keep cleaning and drying rather than closing the lock damp. Moisture can dissolve leftover particles into abrasive slurry, making the lock grind during tightening and increasing wear. Reassemble only when the sleeve and lock interior feel smooth and show no moisture.
That residue can migrate back into the joint when you lubricate or tighten it, undermining smooth operation and shortening service intervals over repeated use.
Air-Dry Completely
When cleaning is complete, air-dry the leg-lock threads, lock interiors, sleeves, and tube sections fully before reassembly. Rinse parts, then set them where air reaches every surface. Don’t rely on a towel alone; moisture can remain inside locks or beneath sleeves, especially after mud or sand exposure.
Allow overnight when needed, and wait longer if dampness remains. Check threads, plastic shims, and anti-twist sleeves; reassemble only when no water sheen remains. For white internal plastic sleeves, rotate each in its mating bore and feel for smooth, dry movement.
Don’t close a lock while parts feel gritty or wet. Dry leg tubes and threads fully; residual water, especially salt water, can leave corrosive residue and increase friction. Complete drying keeps grit from forming abrasive paste in threads.
Check Sleeve Seams
With the sleeves dry, inspect each seam for cracks, misalignment, or grit before reassembly. Check the plastic compression sleeve around its circumference. A cracked or offset seam can mean you tightened the lock over grit.
Look for embedded sand and wear marks; particles can make the next extension and tightening cycle grind. On designs that use white plastic shims, inspect them for cracks. Replace a worn or cracked sleeve instead of trying to correct the problem by tightening the lock again.
Confirm that each sleeve section sits flush and in its orientation. A poorly seated seam can leave micro-gaps that collect grit and prevent compression. Once the parts are clean and intact, reinstall them squarely so the lock closes smoothly without rough spots.
Avoid Direct Heat
After rinsing the leg locks, let every part air-dry or wipe it with a lint-free rag before reassembly.
Don’t use a hair dryer, open flame, or another direct heat source. Heat can warp or glaze internal plastic and nylon components, changing how the sleeve fits against the threads. Trapped water or solvent may expand rapidly when heated, worsening that interface and making the mechanism more likely to retain grit during later use.
If you rinsed grit from the lock, let the sleeve and threads dry completely. Wipe moisture from crevices with the rag, then allow the parts to air-dry until you can run a finger over both surfaces without feeling dampness. Any leftover moisture can attract dust and leave the lock feeling gummy later.
Confirm Before Reassembly
Before reassembly, make sure every sleeve is fully dry and free of grit. After cleaning, check internal plastic parts, including sleeves and shims, for moisture; trapped water can combine with residual grit and contaminate the lock.
Inspect each sleeve for cracks, distortion, or signs of compression damage from tightening a gritty lock. Replace any damaged part before proceeding. Then run your finger over sleeve surfaces and the inside of the collar or knuckle. They should feel smooth; even fine grit can turn tightening into grinding and score components.
Seat each sleeve in its correct position and orientation. Gitzo sleeves mustn’t sit offset; some designs, such as RRS, allow either orientation. Only dry-tighten after you’ve confirmed every sleeve sits correctly; damp or mis-seated parts can worsen creep or slip under heavy camera load.
Desert Dust Schedule
In desert dust, inspect your leg locks after every shoot and clean any grit from the lock surfaces. Service them every 5–10 shoots, or sooner if you feel grinding when tightening or loosening. During peak season, schedule a deep clean monthly and reassemble only when parts are fully dry.
Inspect After Every Shoot
Make a quick leg-lock inspection part of every post-shoot routine in desert dust, sand, or coastal conditions. After each shoot, cycle each lock open and closed while feeling for grinding grit or resistance. Check whether each leg holds position under load rather than creeping. Treat a lock as suspect even when it looks clean: fine particles in the collar or threads can create friction and score surfaces.
In dusty conditions, rinse the tripod with locks still engaged, so debris won’t drop into the threads during handling. If you notice grinding or slipping, address it promptly before the next outing. Watch for vertical tube scratches, cracked shims, or weaker holding power; these signs call for deeper service. Inspect each leg separately and record recurring symptoms to catch deterioration early.
Clean Dusty Lock Surfaces
Wipe each lock exterior, especially the knuckle, after every dusty shoot; rinse only the outside if needed so sand doesn’t wash into the threads.
Use a clean, dry rag and rotate each leg section as you wipe, clearing grit from collars, seams, and exposed lock surfaces. Don’t direct water or cleaner into a lock; moisture can carry abrasive particles inward. Before tightening or loosening, feel for smooth, even movement. A grinding or scratchy sensation means grit may be caught in threads or cam surfaces, so stop forcing the lock and clean it promptly.
Twist locks need particular attention: trapped sand can abrade aluminum or carbon surfaces with each turn. Keep lubricant off threaded friction areas; grease attracts dust and holds grit against contact surfaces. If roughness returns after separate shoots, treat it as a signal for immediate cleaning rather than continued use, and inspect before the next setup.
Service Monthly in Peak Season
During peak desert-dust season, inspect and clean your tripod leg locks about once a month.
Grit in the threads and cam interface can turn smooth tightening into grinding, creating rough spots and long-term slip or creep under load. After dusty shoots, wipe visible particles away. If a lock feels gritty or won’t clamp firmly without micro-adjustment, service it immediately; degraded locks can reduce stability and productivity.
For monthly cleaning, disassemble one leg section at a time. Spray WD-40 into leg threads and inside the knuckle. Scrub threads with your finger while pressing inside the knuckle. Reassemble sleeves and parts in their correct positions.
Keep locks dry; don’t grease leg locks or threaded friction locks: lubricant traps dust and sand, worsening lock feel over time, often too.
Track Smoother Lock Rotation
After each shoot, turn each leg lock through its normal tightening-and-release arc by hand and note how smoothly it moves; a grinding or crunchy feel means grit may be wearing the mechanism and you should clean it soon.
If you see roughness after sand, mud, or salt spray, clean threads and internal lock surfaces promptly; don’t wait for failure. Time setup: if one leg takes over 45 seconds compared with usual, inspect the lock.
During cleaning, check inner tubes for vertical scratches and plastic shims or bushings for cracks; these indicate trapped grit and wear that can worsen rotation under load. When the lock turns smoothly and holds without creeping, extend the interval. Recheck after water or mud exposure and after next few uses.
Corroded Lock Threads
When a twist-lock turns with gritty resistance, check for corroded threads, especially after sand, silt, or salt spray. Grit lodged in the threaded collar or contact bushing can make smooth screw action abrade aluminum or carbon surfaces. After a coastal gale or submersion, service the lock sooner: salt residue can initiate corrosion where the threads meet.
If tightening or loosening requires extra torque, don’t force repeated cycles. Clean the threads afterward; forced operation can score metal and leave permanent rough spots.
Disassemble the lock as its design permits, then rinse away salt and dirt with water. Use isopropyl alcohol for remaining residue, and let components dry fully before reassembly.
Don’t apply WD-40 or heavy grease to hide rough movement. Residue can trap grit and worsen abrasion and corrosion. Reassemble dry, then test the lock gently.
Misaligned Lock Collars
If a twist-lock tightens unevenly or feels gritty, check whether its collar sits squarely on the bushing or shim. Grit can keep the collar from seating evenly. Stop if each attempt makes it sit more crooked; forcing it can score leg tubes and permanently roughen the interface.
Use this one-leg-at-a-time workflow to preserve section-specific parts and tolerances:
- Clean grit from collar, bushing, and shim.
- Refit each plastic sleeve in its correct location, including any internal sleeve.
- Confirm the threaded collar compresses the bushing or shim squarely against the inner tube.
- Tighten smoothly, then check for creeping or slipping under load before use.
Uneven compression can cause movement, so don’t compensate with extra force or repeated micro-adjustments; correct alignment first, then test the lock.
Log Each Service Date
Log every leg-lock service date in a checklist or app, noting any grinding grit and what you did—such as a rinse or deep clean, and whether you reassembled the locks dry. After a shoot in sand, silt, or salt spray, or after submerging your tripod in water or mud, service the locks immediately and mark that entry as priority cleaning. For routine use, set a cadence, such as once per season or after several months of frequent field work.
Then adjust it to match how quickly grit accumulates and whether locks feel gritty or grind during tightening and release. Record the method: field rinse or deep clean with a toothbrush and warm soapy water. Note if you reassembled the locks dry. These entries reveal wear patterns and help you clean before degraded joints or threads cause failure. Review the log before trips; repeat that method and shorten intervals when contamination returns quickly after dirty shoots.
Conclusion
Keep your tripod’s leg locks reliable by matching service to use, not the calendar. After dusty shoots, clean grit from sleeves and threads; in ordinary conditions, inspect and service them monthly. Brush gently, dry parts before reassembly, and check that collars rotate smoothly and hold firm without excess force.
If you find corrosion, misalignment, or slipping, stop using the tripod until you correct the fault. Log each service date so you can adjust your schedule.