How to Set Up an Overhead Tripod for Flat-Lay and Top-Down Video
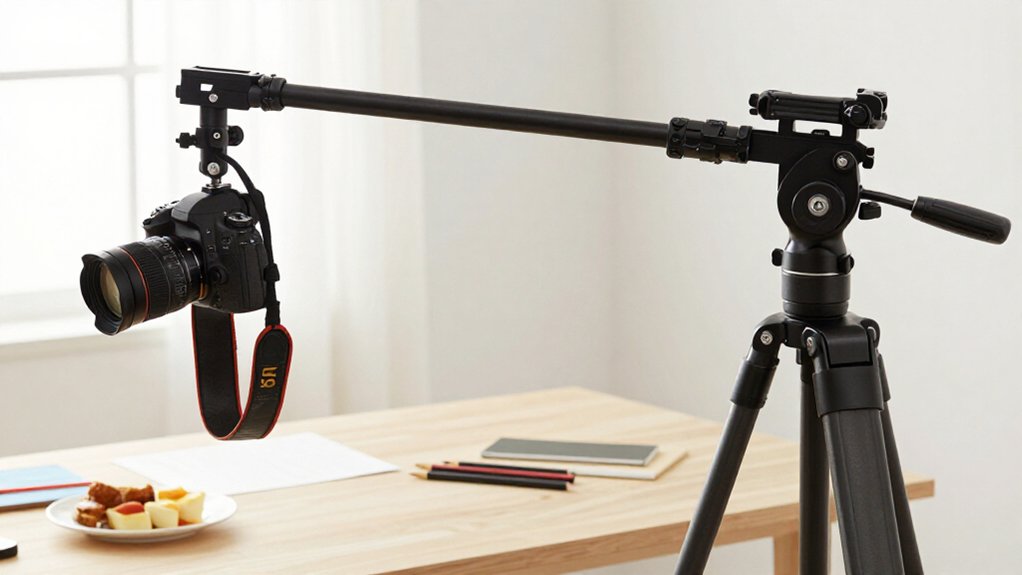
Center your tripod over the work surface and point the camera straight down, keeping the sensor parallel to the tabletop.
Use a stable overhead rig at a safe height, with the arm near the centerline and a counterweight opposite the camera.
Extend and lock each leg, then raise the center column gradually.
Clear clutter, secure cables, and test focus and exposure.
Push the base; retighten loose joints.
Check the remaining details to keep footage steady.
Stable, Centered Top-Down Framing
Mount the camera directly above the center of your work area, with the lens pointing straight down, to keep the flat-lay frame symmetrical.
Begin with the camera 24–48 inches above the surface; capture the full layout without tilting. Keep the sensor plane parallel to the tabletop, and align the lens over the visual center so the edges remain balanced. Lock the head and center column firmly; even slight movement can shift the composition between takes.
After locking, check live framing on a monitor, and correct any offset before recording. Move the camera itself to refine placement rather than changing the angle. If a wide lens makes straight edges appear bowed, zoom in or choose a longer focal length.
Recheck margins around props, then record when the frame looks even. Check the top, bottom, left, and right margins.
Gear and Overhead Clearance
Once your framing is centered, choose a tripod or overhead rig that can raise the camera about 24–48 inches above the table.
Run a dry test: center the tripod, find the minimum camera-to-table height that frames your subject, and check for legs or a center column. Choose hardware that keeps the image steady, not just high.
- Use an adjustable center column that tilts near 90°, such as the Manfrotto 190XPRO, for a direct overhead angle.
- If your lens needs extra reach, add a lateral arm and confirm the head supports your camera and accessories without sagging or vibration.
- Skip chairs and step stools; they can shift beneath the rig.
- Add sandbags to tripod legs and the arm’s opposite end to counterbalance the load.
Step 1: Remove Distracting Background Clutter
Keep the overhead frame clean by laying down one continuous background, such as seamless paper, fabric over a felt or silence-cloth layer, or a clear tabletop. Extend paper past the shot edges, or cover the entire table, so borders, seams, and props stay out of frame.
Treat the surface as a two-dimensional canvas: remove stacked items and tall objects, keeping only essential pieces. Top-down framing flattens depth, so small clusters look busy.
For fabric, add felt or silence cloth underneath to keep steam or moisture from staining wood; overhead light can reveal marks. Before recording, check the live image on an iPad or remote monitor. Spot labels, cords, stray tools, and other distractions, then clear them from the visible background before you roll now.
Step 2: Lock the Tripod Legs Firmly
With the background clear, secure the tripod before framing your shot. Extend and lock every leg fully, including each adjustable section, then check that every clamp or latch feels tight. Loose joints can turn a floor vibration into shake across your overhead frame.
Set the feet on a firm, level surface; don’t prop the rig on a chair, stool, or uneven support, where a foot can slip and shift your composition. Add a sandbag or weight low on the tripod to damp micro-movements. If you’re using a lateral arm, balance it with weight at the opposite end. Before recording, push the tripod side to side and watch the camera or phone. If you see movement, retighten the locks, improve the footing, and repeat the test.
Step 3: Extend the Center Column Carefully
To reach the required camera height, measure the distance from the lens to the surface, then loosen the center-column lock slightly and raise the column a few centimeters at a time. At each setting, tighten the lock firmly, then gently push the tripod head to check for movement before you mount your camera.
Keep the column centered over the tripod base; a tilted extension shifts the load and can make the frame bounce. Don’t pull it to full length just to gain height: the raised column can transmit vibration into your shot.
Whenever possible, set the legs higher and use only the column extension you measured. If your stand still feels springy, add a counterweight or sandbag to the legs during the first test.
Step 4: Attach the Phone Holder
Choose an overhead-rated phone holder that clamps your iPhone snugly, then attach it to the tripod with its 1/4-20 screw or a matching adapter.
Match the holder’s thread to the tripod head, then tighten it until rigid. Seat your phone fully in the clamp; adjust the jaws to grip its edges without covering buttons or the camera. Add a safety tether when possible, securing it to the mount.
Center the lens over your shooting surface, keeping the phone roughly 24–48 inches above it for typical flat-lay framing. Open a live preview in an app such as Detail. Check that the surface fills the frame, the lens points straight down, and the composition leaves space for hands or props.
Lock the holder’s adjustment joints when the view looks right; even a slight shift can alter your framing.
Step 5: Test for Arm Movement
Once the phone’s framed, gently move the overhead arm through the up, down, and side-to-side motions you’ll use while filming. Watch the phone’s position against the tabletop edges; any visible wobble can shift your composition. Lock the tripod head, arm segments, and swivel or tilt joints, then repeat the movement test.
An unlatched stage may creep slightly and create framing drift in a recording.
If you’re using an extension arm, test at its maximum reach and height first; the added leverage can amplify sway. Mount your actual phone or camera, attachments, and counterweight or sandbag, then repeat the same motions.
Record 5–10 seconds while lightly bumping the tripod base by hand, not the device. Review for blur or rolling micro-jitters that signal vibration or arm movement.
Step 6: Tuck Away Loose Cables
Route power, charging, AV, and trigger cables up and behind the tripod legs, then secure them with gaffer tape so they can’t drift into your overhead frame.
Leave a short slack loop and tie it to the stand with Velcro straps; clip the remaining cable length to the lower pole to limit sway. Keep every run off the table edge, and route it away from your feet so you won’t snag a line while adjusting the stand or nearby lights.
For an iPhone or iPad remote, such as Detail, run device cables along the far side of the setup and tape connectors down to prevent a mid-take disconnect. Keep thick cables outside the shooting area. Check the live composition closely for cable silhouettes or reflections on glossy surfaces, then reroute anything visible.
Treat each cable like rigging: secure it before you start recording, and keep loose runs clear of every walking path.
Verify Focus and Exposure
With the camera fixed overhead, tap the subject to set focus—or adjust focus manually—then lock it to prevent hunting during the take.
Record a three-to-five-second test clip and inspect the iPhone screen or Detail app monitor. Check the histogram and brightness for clipped highlights on bright props or food oils.
At 30-fps video, set shutter speed to at least 1/100s; raise it if subject motion or contact causes vibration. Confirm the locked setting hasn’t changed.
View a test frame at 100% zoom to catch softness; overhead framing exposes focus errors across the scene. If edges look soft or brightness varies, adjust lens zoom or position.
Avoid very wide focal lengths, which can distort the layout and weaken edge sharpness. Recheck focus and exposure together.
Prevent Tripod Leg Tipping
After confirming focus and exposure, stabilize the tripod before reaching over the set.
Choose a wide stance and fully extend each leg; partial extension can let feet walk as you mount or adjust the camera. Hang a sandbag low on the legs, or use a stability hook, to reduce tipping torque. For a lateral arm, add counterweight opposite the camera and keep the arm near the centerline.
| Check | Action | Visual cue |
|---|---|---|
| Base | Push laterally | No wobble |
| Locks | Re-lock clamps and head/column | Firm joints |
Before shooting, push the base sideways, then re-lock leg clamps and the head and center column so small shifts don’t build. Keep your feet on the ground; never balance on a chair or stool. Adjust height and angle from the ground, avoiding bumps that might tip the rig. Securely.
Lubricate Tripod Joints
If the center column or leg joints resist movement or squeak, apply a small amount of silicone spray or light lithium grease to the telescoping sections so overhead adjustments stay smooth.
Before shooting, cycle each leg and raise and lower the center column. Rotate the pan-and-tilt head so lubricant coats moving surfaces evenly and won’t create sticky stiction mid-shot.
Wipe away excess grease near the camera mounting plate and 1/4-20 threads; residue can let the head clamp slip under a phone or DSLR. Then retighten every knob and lock. With the camera mounted, check joints for play and confirm the frame stays rock-solid.
Lubricate only when you feel resistance or hear squeaking. Extra lubricant attracts dust and grit, which can increase wear and undermine stability.
Conclusion
Before you record, center your frame and check overhead clearance. Place gear outside the shot, clear distracting clutter, and lock every tripod leg firmly. Extend the center column only as far as needed, then verify that the setup can’t tip.
Tuck away loose cables so they won’t snag a leg. Set focus and exposure for the scene, then inspect the image edge to edge. If joints feel stiff, lubricate them according to manufacturer guidance.