How to Attach a Tripod to a Backpack for Hiking and Travel
Collapse the tripod legs fully, lock them, and remove the camera. Check leg locks for damage and smooth operation.
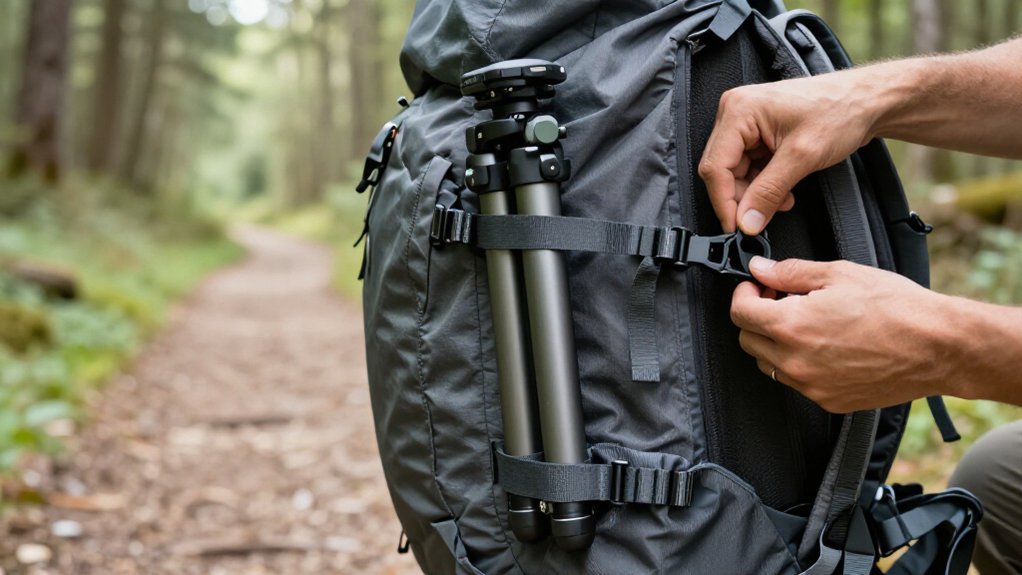
Fasten the folded tripod parallel to your pack with upper and lower compression straps, keeping its heavier end close to the frame.
Choose a side mount for quick access or center placement to reduce sway. Tighten straps, secure the foot strap, tuck loose ends, then shake your pack to confirm the load stays stable. Keep exploring.
Side-Mounting vs. Center-Mounting
Side-mounting keeps your tripod easy to reach and adjust, but it can block side pockets. Choose this setup when you expect to use your tripod and can spare access to a pocket. Check that the tripod clears the ground as you walk; a lower position may reduce snags on rough terrain, though it can make the pack awkward to set down.
Center-mounting places the tripod nearer your pack’s middle, helping balance its weight and reducing sway compared with carrying it on one side. It’s a better choice when stability matters more than quick access. Collapse and lock the legs before securing the tripod, since an unsecured unit can shift against your body. Weigh access, balance, and terrain to choose the option that suits your hike.
Tripod Strap Placement
Tripod straps usually sit on the side or bottom of a hiking pack. Choose placement based on access, balance, and how you use your bag.
- Side: You can reach the tripod quickly during a short stop. Check nearby external pockets first; the tripod and strap may block them or compete for the same space.
- Bottom: You’ll keep the tripod tucked out of your way while walking. However, the pack may feel awkward or unstable when you set it on its base to reach gear.
- Secure the load: Position the tripod legs so the strap’s webbing supports their weight. Tighten the adjustable buckle or equivalent closure until the tripod stays snug and doesn’t bounce as you hike.
Test the fit and access with your pack.
Step 1: Inspect Tripod Leg Locks
Before attaching the tripod, check that each leg lock engages fully and isn’t cracked, bent, or loose. Test each lock by extending and retracting the tripod a couple of times. Listen for a consistent click or feel it tighten securely; then apply light hand pressure to each leg. It shouldn’t slide or extend.
Check both sides of every lock for alignment and smooth travel. If one side hangs up or disengages, don’t trust the tripod on your pack until you’ve corrected the issue.
Wipe away dirt, grit, or corrosion around each mechanism so it grips without binding. Confirm the locks hold the legs in carry position; movement can loosen them. Replace damaged parts or follow maker instructions; don’t force stiff locks. Check everything again before you head out for your hike.
Step 2: Collapse the Tripod Legs
With the leg locks checked, shorten the tripod by fully collapsing its legs, then lock them in place so they can’t extend as you walk. Fold each section completely rather than leaving a tube partly extended; the shorter profile is easier to secure and less likely to catch on branches, rocks, or passing gear. Before you carry it, remove your camera from the tripod.
This keeps the lens and camera body from taking knocks as you handle or reposition the folded support. Check that no leg section protrudes or can slide outward, since movement can create a snag or trip hazard when your pack shifts on uneven trails or during travel. Keep the tripod compact until you’re ready to mount it again, and confirm the locks hold with a gentle check. A fully collapsed, stable tripod is safer to carry and simpler to position for attachment to your pack.
Step 3: Use Backpack Compression Straps
Once the tripod’s legs are collapsed, place it parallel to your pack and secure it with both the upper and lower compression straps. Use external straps to cinch the folded tripod along the pack’s side. Keep its legs tight against the bag so they won’t sway or bounce loose on uneven trails.
Position the heavier end toward your back to reduce wind resistance and help your load remain stable as you hike. If your pack’s webbing adjusts, fine-tune the tension until the tripod feels firm to the touch. Don’t overtighten: excessive pressure can deform the tripod or strain the pack’s fabric. Check both straps periodically during travel, especially after rough sections. Vibration can loosen webbing over time, so retighten it whenever you notice slippage.
Step 4: Secure the Tripod Head
To keep the tripod head from shifting as you hike, remove the camera and tighten the head and carry handle before strapping the tripod to your pack. Collapse the legs and lock each section so it can’t extend, snag gear, or shift weight onto the head. Position the tripod with its head against the pack’s frame or padding, where it won’t take downward impacts. The head and quick-release area are vulnerable, so don’t leave them exposed.
Use a strap loop around the top or attachment hardware near the tripod platform to secure the head area as well as the body. Keep straps clear of the head controls, quick-release lever, and safety catch; pressure on these parts can move the head or release the camera.
Step 5: Check Strap Tension Against Tripod Movement
Pull the attachment strap tight enough to press the tripod legs firmly against the pack, not just snug around them. Before setting off, collapse the tripod and lock its legs; an unfastened extension adds leverage and can quickly reduce tension.
Grab the tripod’s top while the pack rests stationary, then shake it vigorously. If you feel side-to-side wobble or see movement, tighten the strap and test again until the tripod stays still. For a strap running under or around the tripod, seat the buckle flat and pull the strap through securely so vibration won’t loosen it.
Walk 5–10 minutes with your pack on, then pause and check that the tripod hasn’t shifted and the strap hasn’t crept with repeated bouncing during your first hike.
Step 6: Tuck Away Loose Strap Ends
After securing the tripod, tuck the loose strap ends firmly under a webbing keeper or wrap them around the strap so they won’t flap or catch on branches and zippers. If your strap has a quick-release buckle, make sure it’s fully seated before tucking the remaining webbing. For a side-mounted or under-bag carry, route the tail along the pack’s webbing, then fold it flat against the backpack.
Keep the end contained so it won’t snag nearby gear. Give the pack a gentle jostle to see whether it slips free. Walk for a few minutes, then check the strap ends again and retuck any that have loosened as the tripod settles. A secure tail stays clear of branches, zippers, and other hazards along your route.
Check Backpack Balance With Tripod
Before you leave, collapse the tripod and secure it low or along the side of your pack so its weight stays close to your center of gravity.
Stand up, walk a few steps, and turn gently. Notice whether the pack tilts or sways; if it does, reposition the strap webbing or move the tripod to the opposite side.
Keep the tripod secured with adjustable straps, preferably with a quick-release buckle, so it can’t shift as you walk or absorb an impact on uneven ground. Lock the collapsed legs; extension can change the load’s balance.
Finally, check that the attachment doesn’t interfere with the pack’s fit, especially at the hip belt. A snug, stable belt helps limit sway and keeps the load over distance.
Loose Tripod Foot Straps
Use a loose tripod foot strap to bundle the collapsed legs and keep the tripod from dangling, snagging, or swinging as you walk. Wrap the strap around the feet or leg ends, then cinch it snugly so the legs stay collapsed and locked during travel. Keep it clear of leg locks and pan-and-tilt controls, so you can unfold the tripod quickly when needed.
| Strap position | Walking result |
|---|---|
| Feet bundled | Legs stay together |
| Loose fit | Tripod may swing |
If your tripod includes a carry strap, keep using it for the best fit. Otherwise, choose adjustable webbing with a quick-release buckle to suit your model.
Before you leave, walk over uneven ground. Check that the foot strap holds securely and hasn’t slipped; retighten it if needed.
Lubricate Tripod Leg Locks
Once the foot strap keeps the collapsed legs together, check the leg locks so they won’t seize or loosen during your hike.
Before attaching the tripod, apply a little dry lubricant to each lock’s moving interface. Dust and moisture can make locks stick, while excess grease attracts sand.
For twist locks, open and close each collar, then coat only the locking surfaces with a thin film. For lever locks, check that each lever snaps tight and moves freely. Lubricate contact points minimally, then wipe them clean to keep your hands and tripod feet from getting slick.
Cycle each lock several times. Extend the legs and confirm they hold securely without creeping; hiking vibration can shift their length. After travel, wipe residue away before storage.
Conclusion
Before you head out, secure your tripod with the backpack’s compression straps, tuck away loose ends, and check that the load feels balanced. Choose a side or center mount that suits your pack and keeps the tripod from shifting as you walk.
Inspect the leg locks and foot straps regularly, and clean or lubricate them when needed. A few quick checks help protect your gear and make carrying it more comfortable on the trail or in transit.