Do You Need a Camera Cage? Who Benefits and Who Can Skip It
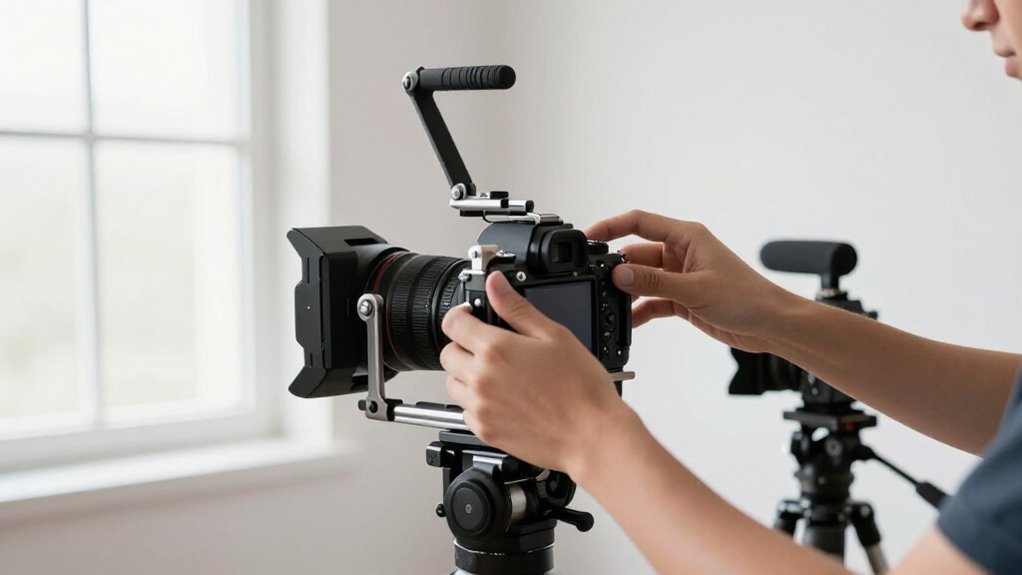
You’ll benefit from a camera cage if you mount a monitor, microphone, wireless receiver, or accessories, or need cable strain relief.
Its threaded mounts and rigid grip can steady handheld footage, protect the body, and keep ports from bearing cable movement.
You can skip it for a lightweight, mostly bare setup, especially if you value quick battery access or worry about blocked vents.
Check handle and tripod clearance before choosing one; details ahead explain why.
Who Benefits From a Cage?
A camera cage suits you if you shoot video or ENG-style work and need more mounting options than a hot shoe can provide. Cages add standardized 1/4-20 and 3/8-16 threads, letting you mount monitors, microphones, lights, and accessories that would overload a shoe. In contrast, a hot shoe offers limited attachment points and less flexibility.
A metal cage also acts as an exoskeleton, helping absorb impacts in rugged or fast-paced environments. Choose one if you need modularity: you can add or remove a recorder or power plate without replacing the camera body. Cages and optional cable clamps can secure HDMI or USB-C connections, reducing strain and the risk of plugs loosening or buckling. Added handles and mass can also improve handheld stability and reduce fatigue.
How You Actually Shoot
How you shoot matters more than whether a cage looks useful on paper: for handheld or run-and-gun video, its rigid grip and added mass can reduce micro-jitter, especially when your camera lacks IBIS.
That advantage is less pronounced with effective IBIS, but a cage still gives you more purchase during long takes, particularly with heavier lenses. Extra bulk can steady your hold and ease fatigue compared with a bare mirrorless body.
When you add a monitor, mic, or recorder, you may exhaust the hot-shoe space. Multiple 1/4-20 and 3/8-16 threads let you position accessories precisely rather than crowd the camera body. Side and top mounts also suit behind-the-scenes or first-person work in tight spaces.
In crowds, climbing, or busy sets, a cage adds an exoskeleton that can absorb bumps and help protect controls, ports, and screen. Choose it when those handling or mounting gains matter; skip it when your setup stays light and controlled on simple shoots.
Battery Door Access
Even a well-designed cage should let you open the battery compartment without removing it, but tight-fitting models can slow swaps or block the door latch. Quick access keeps a seconds-long change from becoming a reset.
If the cage crowds the latch, you may need to loosen hardware or remove it. Compare your workflow before buying: you can carry more batteries or use external power, but both add tradeoffs.
| Setup | Battery swap |
|---|---|
| Open clearance | Fast |
| Blocked latch | Slow |
Check the exact cage version against your camera; door clearance varies by brand and revision. Test the latch with the camera installed, and confirm you can change batteries without tools.
For frequent swaps, prioritize direct access; if you rarely change packs, a tighter fit may suit you.
Top-Handle Clearance
Check handle height and overhead clearance against your camera’s controls and shooting space. A cage can reduce accessory interference by separating the grip from monitor mounts, rails, and arms, while a bare camera may suit a compact rig. Make sure you can still grip securely with your monitor tilted into position.
Handle Height
Before choosing a top handle, confirm its height clears your monitor, EVF, lens barrel, and other accessories. With a fixed screen, a lower handle may keep your rig compact; a swivel or tilt monitor may need more room to move without striking the handle or your hand.
On a heavy rig, added handle height can improve low-angle control, but only if the grip clears the lens barrel.
If you add an Arca plate L-bracket that changes camera orientation, check that the handle clears the cage and doesn’t disrupt tripod seating.
For video, too little clearance can force an awkward grip, reducing stability and increasing shake during long takes. Check the complete setup and test monitor movement and grip before buying.
Overhead Clearance
Handle height affects more than monitor and lens clearance; it also sets your rig’s maximum height in low-ceiling rooms and tight interiors. A cage usually raises the camera above its bare body, so a top handle can prevent you from lifting the rig beneath shelves, doorframes, or low ceilings. Before choosing a setup, measure vertically from your tripod plate or hand-hold point to the handle’s highest point.
Then compare that figure with the space you’ll use, including movement between shooting positions.
In cramped interiors, a lower-profile grip may preserve one-handed carry while reducing the chance of striking the ceiling. If you don’t need a top handle, removing it can restore clearance and simplify overhead lifts. Choose the tallest configuration your working space allows.
Accessory Interference
Beyond overall height, a top handle can interfere with accessories mounted around the camera. Before you add a cage, check clearance against your monitor or EVF, screen hinge, and cold shoe or NATO rail gear. A handle may collide as you tilt the display or adjust it.
Use the cage’s 1/4-20 and 3/8-16 points to move accessories away from the top; arms can crowd the handle.
If you’re using a swivel-and-tilt monitor mount, test its rotation range, especially when you’re shooting low architectural views. Check the screen won’t strike the handle or cage straps. An Arca Swiss plate or L-bracket can affect your grip and angle changes.
If contact persists, reposition the handle mount or choose a cage or handle with different geometry.
Compact Rig Setup
For a compact rig, choose a cage with a low-profile top so the handle clears your monitor, EVF, and cables.
Check a swivel/tilt monitor mount, such as SmallRig 2905, through its full range before tightening the build; the screen shouldn’t strike the handle. If the cage puts the handle too high, you’ll lose framing options and stability when you use it for low-angle handheld control.
Clearance matters even more when you add an Arca-Swiss plate for head rotation: you can’t shift parts to work around a collision without rebalancing the rig.
For cable-managed builds, check that the top handle doesn’t pinch or tug USB-C or HDMI leads secured by clamps such as SmallRig 2981, especially as the monitor swings. Test it moving.
Wireless Audio Receiver Mounting
A cage’s threaded holes, cold shoe, or side rails give you more receiver-mounting options than a hot shoe alone. Position the receiver near the camera to shorten cable runs, then use clamps to reduce strain on its ports.
Compared with a shoe-only setup, the cage’s rigid frame helps keep the receiver secure during handheld movement, and you can reconfigure its position as your rig changes.
Receiver Mounting Options
Because a camera cage adds standardized 1/4-20 and 3/8-16 threads, you can mount a wireless receiver in a position that keeps its cable within reach without straining the camera’s USB-C, HDMI, or audio ports.
Compared with relying on the camera’s hot shoe alone, threaded points let you shift the receiver to the left, right, or top of the rig. Choose the position that gives the cable a short, relaxed path while leaving controls accessible. That flexibility matters when a fixed shoe location forces a tight bend or pulls on a connector.
A rigid cage holds the receiver more steadily than lightweight consumer mounts, reducing wobble during handheld takes or movement in crowded spaces. Cable clamps can keep connections seated and prevent cables from loosening or buckling.
Cold Shoe Placement
On a cage, the left-side cold shoe gives your wireless receiver a stable position away from the camera body, reducing the chance that your hands or lens will bump it. Compared with the camera’s single hot shoe, the cage gives you a rigid mount when you’re running accessories.
Place the receiver on the left to help balance the rig and keep the top shoe free for a microphone or monitor. During fast handheld camera moves, this layout helps limit jostling. If threaded holes sit near the cold shoe, add a small clamp or adapter for security. Check lens and control clearance, and keep the antennas unobstructed. With one accessory, the camera’s hot shoe may suffice; the cage shoe becomes useful as your setup grows.
Cable Routing and Strain Relief
Once the receiver’s mounted to the cage, route its cables along the frame instead of letting them pull against the camera’s USB-C, HDMI, or audio ports.
Mount the receiver through 1/4-20 or 3/8-16 threads for consistent routing. Compared with a camera-hanging receiver, cage mounting gives audio and power leads a fixed path. Run them along open frame routes, positioning connectors to limit strain during handheld swings and adjustments.
Optional cable clamps, such as SmallRig 2981-style clamps, keep leads from loosening or buckling as you move the rig or turn your monitor. Secure slack near the clamp, not camera ports, to reduce micro-tension that can cause intermittent connections or port wear mid-shoot. Near a side cold shoe or rail, keep bends wide and fixed to the cage.
Secure Accessory Setup
A cage gives you more secure receiver-mounting options than the camera’s hot shoe alone, with 1/4-20 and 3/8-16 threads for placing the wireless unit close to the body and within easy reach of its controls. Compared with a shoe-only setup, cage threads let you place the receiver where gain and pairing controls stay accessible without blocking a swiveling monitor arm.
Route its output and power cables along the rig to limit port strain from dangling leads or mid-take tugging. On handheld shoots or busy sets, a cage mount is less likely to shift or hit nearby gear, keeping placement consistent between takes.
You can reposition it around add-ons instead of using awkward magic-arm geometry. Flexibility matters when you mount a monitor or other accessories.
HDMI Cable Strain Relief
When you tilt an external monitor, its weight and movement can pull on the HDMI connector, so a cage’s fixed routing points or optional cable clamps keep the lead from hanging freely.
Without that support, each swivel or tilt makes the cable flex at the jack; repeated micro-movement can loosen the port or damage camera-side solder joints. A clamp holds the connector area steady, while simple routing may suffice if your monitor stays fixed and you rarely reposition the rig.
Compare this with leaving the lead loose: it can buckle during reframing, disconnect mid-shot, or catch on clothing and rig parts as you walk. If you shoot handheld with an HDMI monitor on a changing-angle mount, strain relief is a reason to choose a cage. For a locked-off setup, careful slack management may be enough, provided the cable can’t tug directly on the camera port.
Resale Value After Upgrades
Beyond protecting your camera during shoots, a cage can help preserve its resale value by absorbing routine impacts and preventing scratches or accidental button presses. An aluminum cage works like a reusable exoskeleton, limiting wear. Compared with an unprotected body marked by impacts, a cleaner camera gives buyers grounds to accept your price after an upgrade. It won’t guarantee a premium; condition, shutter use, and market demand matter.
Keep standardized 1/4-20 and 3/8-16 mounts and accessories with the kit: owners can reuse that modular setup more easily than one-off parts you’ve removed. When you change bodies, retain the cage and mounts rather than modifying the camera. For high-end cinema rigs, document compatibility and condition; ARRI-class ecosystems make details relevant.
Blocked Cooling Vents
Although a cage protects your camera, a tightly wrapped metal design can cover side or bottom vents and restrict airflow during long takes. During extended recording, trapped heat can raise sensor and processor temperatures, increase thermal noise, and trigger overheating warnings.
Open-frame cages with vent cutouts preserve passive convection better than designs that tightly enclose the body.
Before a long shoot, check:
- Compare cage clearances with your camera’s actual side and bottom vent locations.
- Confirm the cage doesn’t partially cover vents or obstruct airflow once fitted.
- For sustained 4K, 6K, or 8K sessions, choose a ventilated cage or add active cooling.
A snug, fully wrapped cage may suit short clips, but it’s a poorer choice when you record continuously. Match the cage to your workload, not just its protective coverage.
That comparison helps you avoid an unnecessary heat trap without sacrificing useful protection during demanding video takes.
Tripod Plate Compatibility
A ventilated cage can help manage heat, while its mounting points improve tripod plate stability. With a plate attached to one camera socket, torque can loosen the screw or rotate the setup. A cage gives you additional 1/4-20 and 3/8-16 threaded contacts, creating a firmer connection under load.
- If your plate slips, secure it through multiple cage threads to reduce rotation.
- For a heavy monitor or battery, align an Arca-style plate or L-bracket with the cage structure to balance the rig.
- Keep accessories supported by the cage and plate, rather than loading a hot shoe not built for that weight.
This pairing suits handheld-to-tripod shoots: you can mount the assembled rig quickly and repeatably without stripping accessories. A bare camera may not need one.
Conclusion
A camera cage makes sense when your setup needs secure mounting, cable strain relief, or room for a receiver and top handle. It can also protect resale value if upgrades leave exposed points.
But if the cage blocks cooling vents, battery access, or your tripod plate, it may slow you down. Match the cage to how you shoot, not to a checklist. If your camera stays light and simple, skip the extra bulk and cost.